"Set the Stage"
Basic Diorama Assembly Instructions
|
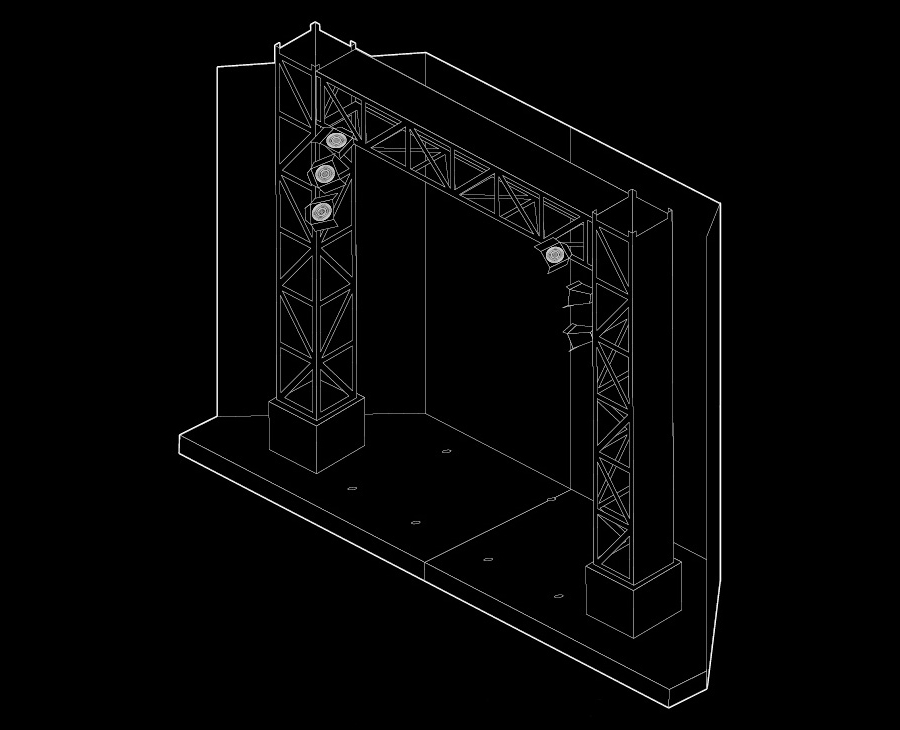
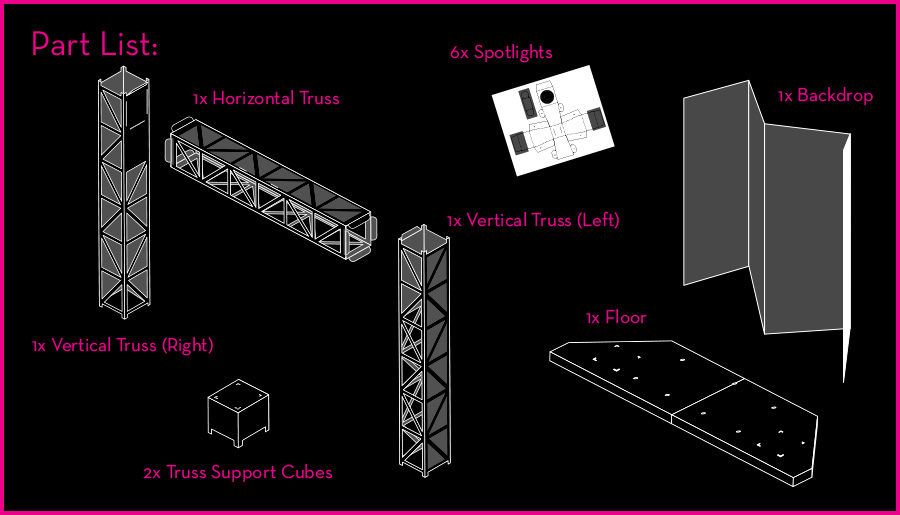
Use these basic instructions as a guide to set up your new stage diorama in its basic configuration.
A few additional notes about this diorama...
-Designed to be used with 11.5" to 12.5" dolls, this set is in 1/6 scale.
-This blank diorama stage set was created in a limited edition size of 300 sets worldwide and will not be reproduced again.
-Designed by Alain Tremblay.
Before you begin...
-Please note that this set is made of cardboard and needs to be handled delicately to prevent bends and damage until setup is completed.
-To assemble this set in its basic configuration, you will need clear adhesive tape and double sided tape.
-You can configure the stage many ways, modify it or incorporate only a portion of its parts to create your own outstanding displays! Possibilities abound; your imagination is the only limit! Have fun!
|
|
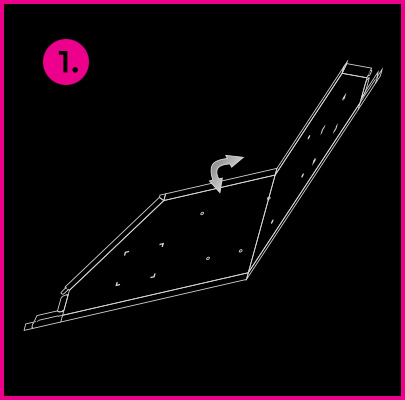
| 1. Open the floor and lay it flat, bottom side up. |
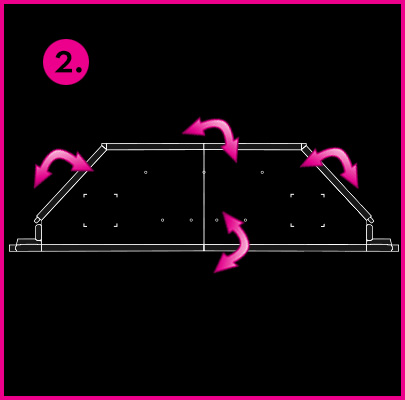
2. Using a flat surface, gently fold each edge of the floor along the crease lines. Press firmly; each edge should be at a 90° degree angle once you are done.
|
|
|
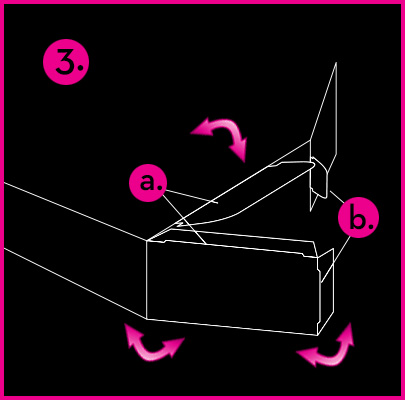
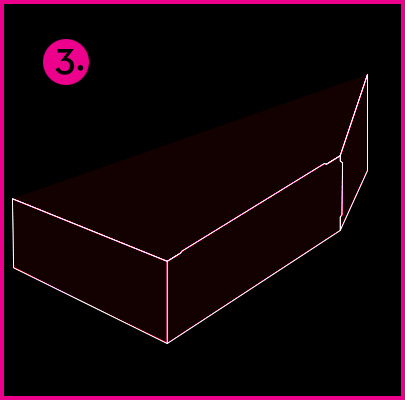
3. Insert the tabs in the corresponding slots to form the side ends of the floor. Please note that the cardboard is very delicate in these areas. Please use caution and take your time. If need be, small pieces of clear adhesive tape can be hidden underneath to re-enforce the side joints and increase strength. Repeat this process for both front ends of the stage.
|
|
|
4.
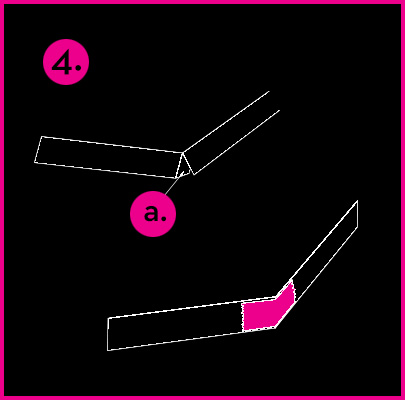
Fold the small triangular (a.) tabs on both ends of the back edge of the floor and tuck them under the angled sides. Secure the two corners with a small piece of clear adhesive tape as shown (this will be hidden by the backdrop).
|
5.
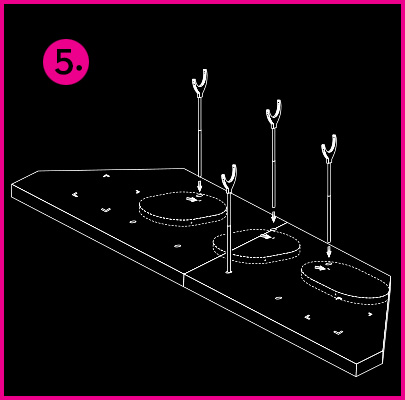
The stage floor is designed to accommodate several doll stands. Insert the stand poles in the pre-perforated holes on the stage and connect the poles in the stand bases as shown. Rotate the bases to hide them under the floor. You can use either the oval or square IT stands for this.
|
|
|
6.
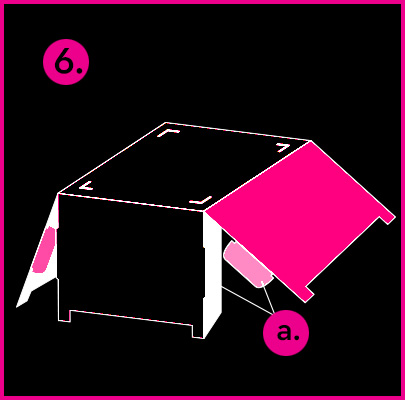
Carefully fold the truss support cubes on each crease line (note: the chrome surface is the exterior). Press firmly with your fingers to make sure that the cardboard is folded properly. Insert the tabs in the corresponding slots in each corner as shown. Repeat this step for both cubes. Set aside for now.
|
7.
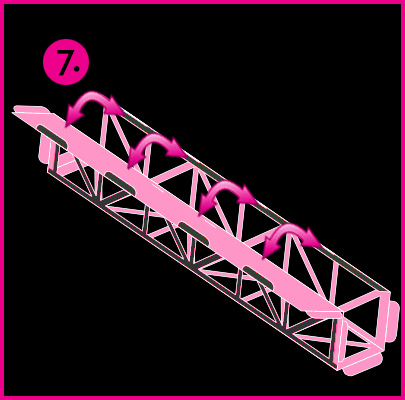
Using a flat surface for support, slowly fold each side of a truss section to form a perfect square tube shape. Close the structure by inserting the four tabs in their corresponding slots as shown. Repeat this process for all three truss sections. PLEASE TAKE YOUR TIME IN ORDER TO AVOID DAMAGING THE DELICATE CHROME STOCK.
|
|
|
8.
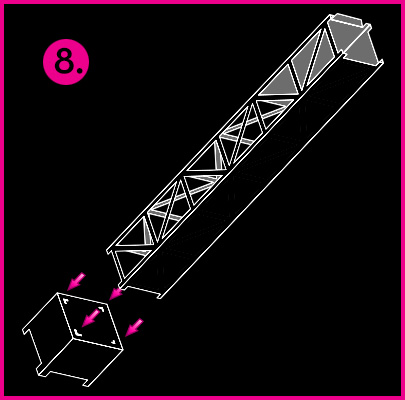
Insert the bottom corner legs of the truss towers into the corresponding slots on top of the cubes assembled in step 6. Repeat this step for both vertical towers.
|
9.
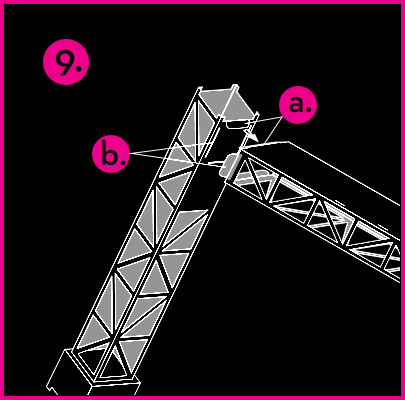
With the opened segments of the structure facing you, insert the top tab of the left vertical truss into the top tab of the horizontal truss piece (9a.). Then, simply lower the remaining three tabs of the horizontal truss piece into their corresponding slots on the vertical truss (9b.). Repeat this process for the right side of the structure. Note: you can further secure the construction by adding small pieces of clear adhesive tape over the tabs inside the horizontal trusses.
|
|
|
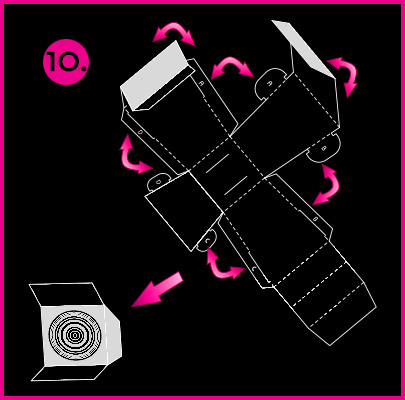
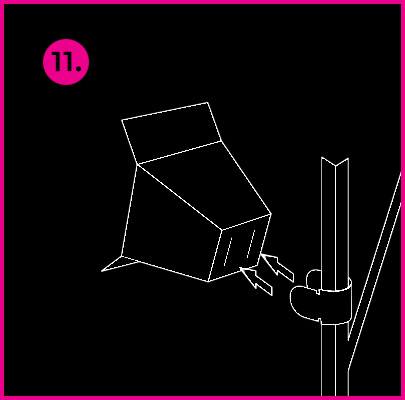
10. & 11. Assemble the spotlights (10.) and attach each spotlight to the structure as you like by wrapping the small tabs around a truss segment and inserting them in the two slits behind each spotlight (11.)
|
|
|
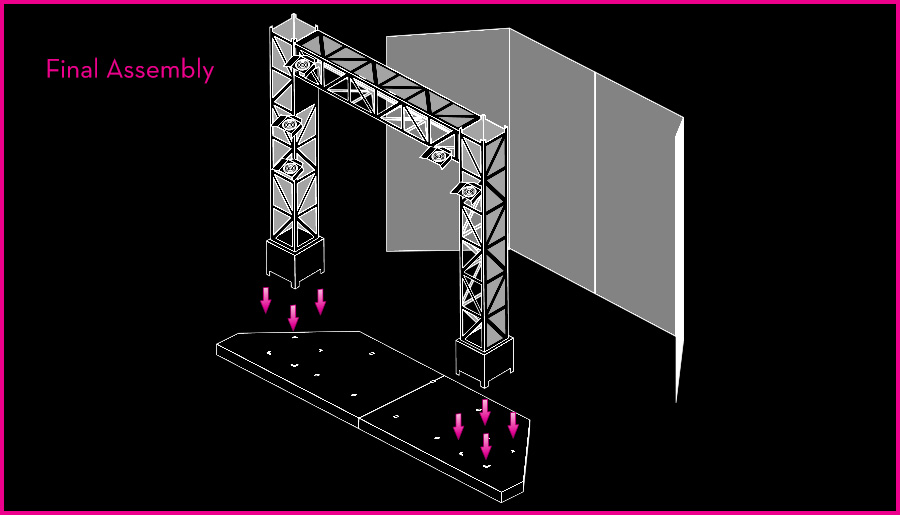
Final Assembly.
Insert the completed truss structure into the floor as shown. Stand the backdrop behind the stage.
|
|
Stage to Catwalk Customization
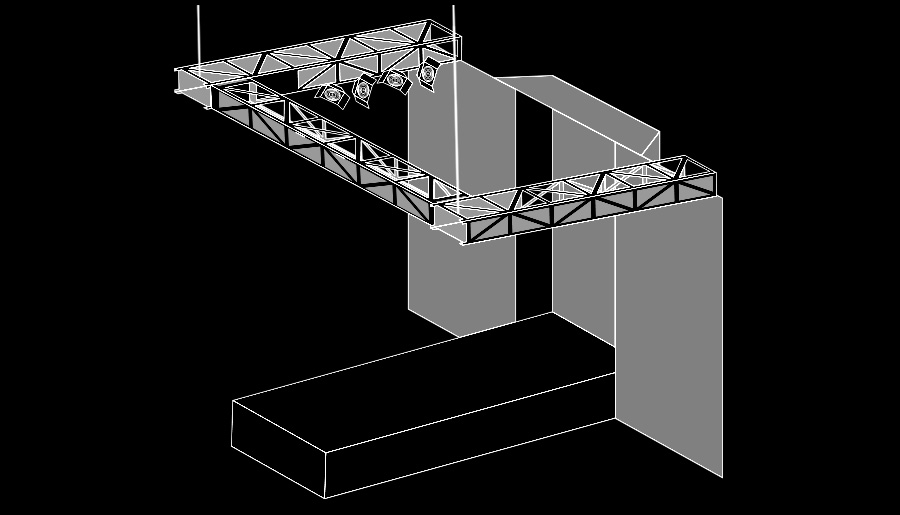
With just a few additional supplies and the plans included in the link below, you can customize your stage into a fashion catwalk!
Supplies needed (not included):
-1X sheet of foam core board or High-Art board,
dimensions 20 X 30 (for the catwalk/stage)
-1X
High-Art board dimensions 20 X 30 (to create the new backdrop, or you can just slice the backdrop included with the set in equal parts on the fold lines)
-2X 3M "Command " Brand (or similar) Self-Adhesive Mini Hooks (CLICK HERE to view example)
-Transparent fishing wire (to suspend the front of the structure inside your display cabinet to the hooks above)
-Clear adhesive tape
-Glue Gun
-Scissors
-X-Acto knife
-Cutting mat
-Metallic ruler
Click on the following link to download the instructions and templates for the stage converstion (please note that the enclosed .PDF is in 1:1 scale and you will need to print this on multiple 8.5 X 11 paper sheets and tape them togheter to trace on foam board and/or high-art panels):
http://www.integritytoys.com/instructions/catwalk_diorama_template.pdf |
Lighting and Additional Tips
If you would like to read more and find out where to purchase the strip LED lighting and get additional tips, please download the following word document:
http://www.integritytoys.com/instructions/diorama_tips.doc
Free Perk for Member/Attendees!
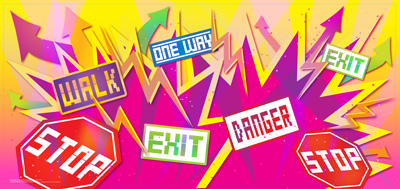
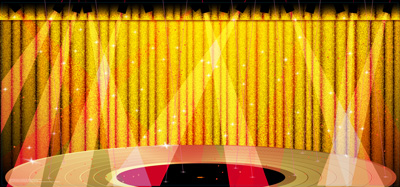
As an additional gift for W Club members who attended the "Set the Stage" diorama workshop, we are proud to offer you these totally cool digital paintings that can be used as backdrops for your diorama, created just for the W Club by Alain Tremblay! Please feel free to download and print any of the following images to really set the scene!
Download, print and mounting instructions:
1. The finished size of the images should be 15.75" X 32" wide.
2. The actual file size varies for each image (please see below). Please be patient as these may take a little while to download depending on your connection speed.
3. The image(s) you chose will open in a separate window, once the download is completed, simply right click on the image with your mouse and save the file to your hard drive.
4. Bring the file to your favorite printer to have this printed on a thin cardboard stock or upload it to an online processor such as http://www.allposters.com/myphotos.
5. Once printed, crop the image on all 4 sides on the pale blue outline using a sharp blade and a metal ruler. PLEASE PROTECT YOUR WORK SURFACE USING A CUTTING MAT AND USE THE NECESSARY PRECAUTIONS NOT TO HURT YOURSELF WHEN USING AN XACTO BLADE!
6. Apply the image to the thick backdrop provided with the set using double sided tape.
7. Using the dull side of a butter knife and a metal ruler, trace score/folding lines on top of your new image to match the fold lines in the thick cardboard backer of the diorama and fold the panels to the desired angle.
8.
Get ready for some major sizzle in your doll displays!
Art © 2013 Alain Tremblay
Fashion Royaly, FR, the "W" logo and Poppy Parker
© Integrity Toys, Inc. Used under permission.
Permission is granted for personal use only. Not for resale.
|
©2013 Integrity Toys, Inc. and the W Club. All Rights Reserved.
Diorama, site content and online workshop: ©2013 Alain Tremblay.
Distribution for commercial use is strictly forbidden without prior authorization.
If you have any issues with this site, please contact us at web@integritytoys.com


